


How to Build an Authorization System with JWT using Nodejs


In my earlier post, I discussed how to invalidate a JWT by implementing a checklist which provides more security to a software system. The purpose of this tutorial is to demonstrate the use of a checklist in the context of developing an authorization system using Nodejs (Express), MongoDb (Mongoose), and Redis.
Prerequisites
The authorization system in this tutorial will be built using Nodejs, MongoDB and Redis. An understanding of my previous article on how to invalidate JWT is needed for easy comprehension in this tutorial. Also, background understanding of the following are required:
- Express.js
- Basic Mongoose experience
- JavaScript Async/Await
- JavaScript try...catch
- Basic Postman knowledge
Introduction
To get things started, I'm going to distinguish between authentication and authorization. These two concepts are often confused with one another. Authentication is the process of verifying the identity of a user who attempts to access a system. For example, imagine showing your identification card to a security officer to obtain entry into an office building. Authorization on the other hand, is the process of handing over control or permission to an authenticated user for them to perform a specific action on specific resources. Return to the analogy mentioned above, once you have been granted access to the office building, the offices you can enter are determined by your level of clearance; that's authorization at play.
Token-based authorization will be our strategy in this authorization system. JWT will be used, as previously described in the paragraph preceding this one. In addition, we will be using the OAuth 2.0 framework concept, which authorizes users through the usage of Access and Refresh Tokens. You can learn more about OAuth 2.0 here.
What are Access and Refresh Tokens
As stated by the OAuth 2.0 Authorization Framework:
Access tokens are issued to third-party clients by an authorization server with the approval of the resource owner. The client uses the access token to access the protected resources hosted by the resource server.
Refresh tokens are credentials used to obtain access tokens. Refresh tokens are issued to the client by the authorization server and are used to obtain a new access token when the current access token becomes invalid or expires, or to obtain additional access tokens with identical or narrower scope.
To summarize, access tokens allow a client to gain access to resources hosted on a server, whereas refresh tokens are used to generate a new access token when an existing one becomes invalid or expired. When it comes to keeping refresh tokens safe, OAuth 2.0 employs some strategies that reduce the likelihood of a refresh token being compromised. You can learn more about keeping refresh tokens safe here.
Setup Environment
Kindly follow the steps below to install Node Package Manager (NPM) and the other required packages. If you have Nodejs installed already, please skip this step and proceed to installing other dependencies.
Download Nodejs from here and install it on your machine. If you prefer to use a package manager to install, you should read this for all operating systems.
To check if you have Nodejs installed run the command below:
node -v
- Node.js comes bundled with Npm, so you don't need to install it again. Run the command below to confirm this:
npm -v
- Install MongoDB from here and follow the instructions carefully to install it properly on your machine. To check if the installation was successful, run this line of code:
mongod -version
- Download and Install Redis from here on your local machine. To check if Redis is installed properly, run the command below:
redis-server
The command above starts the Redis server. In another terminal, you should run the command below to confirm if Redis is working:
redis-cli ping
//PONG
Create a project directory (I named mine Auth)
Create an
index.jsfile in the project directory with the code below:
touch index.js
- Initialize Npm in the directory with the command below
npm init
Give appropriate answers to the prompts that follow in your terminal, below is what my package.json file contains;
{
  "name": "auth",
  "version": "1.0.0",
  "description": "An authorization system with JWT token",
  "main": "index.js",
  "scripts": {
    "start": "nodemon index.js"
  },
  "author": "Okikijesu Elewude",
  "license": "ISC"
}
Install Dependencies
- Run the command below to install express, morgan, nodemon and http-errors:
npm i express morgan nodemon http-errors
- Next, install Mongoose from npm by running the line of code below. You can go through the official documentation here.
npm i mongoose
- Install Node-Redis from npm by using the command below:
npm i redis
- Install Argon from npm by using the command below:
npm i argon2
- Lastly, install jsonwebtoken from npm with the line of code below:
npm i jsonwebtoken
Alternatively, you can copy the complete package.json file below and use the npm install command to install all packages required.
{
  "name": "auth",
  "version": "1.0.0",
  "description": "An authorization system with JWT token",
  "main": "index.js",
  "scripts": {
    "start": "nodemon index.js"
  },
  "author": "Okikijesu Elewude",
  "license": "ISC",
  "dependencies": {
    "argon2": "^0.28.3",
    "express": "^4.17.2",
    "http-errors": "^2.0.0",
    "jsonwebtoken": "^8.5.1",
    "morgan": "^1.10.0",
    "nodemon": "^2.0.15",
    "redis": "^4.0.1"
  }
}
Setup Express
Now that you have completed the installation of all of the required dependencies, you can move to starting up your Express server. The code block below shows the beginning of the server:
const express = require('express');
const logger = require('morgan');
const createError = require("http-errors");

const app = express();


app.use(logger('dev'));
app.use(express.json());
app.use(express.urlencoded({ extended: false }));

// catch 404 and forward to error handler
app.use(function (req, res, next) {
  next(createError(404));
});

// Error Handler
app.use(function (err, req, res, next) {
  res.status(err.status || 500);
  res.send(err);
});

// Server
const port = "8800";
const host = "localhost";

app.listen(port, host, () => {
    console.log(`Auth app running at ${host}:${port}`);
});

module.exports = app;
Inside the package.json file in your program directory , make some changes to the script field. It should look like so:
"scripts": {
    "start": "nodemon index.js"
  }
The modifications done above will enable nodemon to automatically restart your app whenever you make changes to it while it is in the development phase.
Setup Database
Create a new folder inside your project directory and call it Config. Next, follow the steps below:
- Inside the Config folder, create a file and name it
db.js. - Inside the
db.jsfile, you are going to establish a connection to your mongoDB database using mongoose, the code is shown below:
const mongoose = require("mongoose");

const server = "mongodb://localhost:27017/Auth";
const dbServer = () => {
  await mongoose.connect(server, {
    useNewUrlParser: true,
    useUnifiedTopology: true,
  });
  console.log("Database connected succesfully");
};

dbServer().catch((err) => console.log(err));

module.exports = dbServer;
Setup Redis Cache
Before you leave the config folder, create a file that will hold connection to your redis cache by following the steps below:
- Create a file and name it
redisCache. - See below the code to create Class that holds the connection to the Redis cache.
const redis = require("redis");

class Redis {
  constructor() {
    this.connected = false;
    this.client = null;
  }

  getConnection() {
    if (this.connected) return this.client;

    this.client = redis.createClient();

    this.client.on("connect", (err) => {
      console.log("Client connected to Redis...");
    });
    this.client.on("ready", (err) => {
      console.log("Redis ready to use");
    });
    this.client.on("error", (err) => {
      console.error("Redis Client", err);
    });
    this.client.on("end", () => {
      console.log("Redis disconnected successfully");
    });

    return this.client;
  }
}

module.exports = new Redis().getConnection();;
A Redis class was created in the preceding section, and its getConnection method is responsible for establishing a connection between your Redis client and the Redis cache on your local machine, as demonstrated above. For more information on Redis recommended practises for client handling, you can visit this page.
Test the Database and Redis Cache Connections
To test your database and cache connection, kindly follow the steps below:
Step 1
Import the db.js and redisCache.js file into the index.js file.
Step 2
Next, you'll create an immediately invoked function that initiates the connection to your Redis cache. You can find the code snippets below:
require("./config/db");
const redis = require("./config/redisCache");

(async () => {
  await redis.connect();
  return redis;
})();
Step 3
In your terminal, navigate to the project directory and run the command npm run start. The output of the command in your terminal should look like so:

Create our Database Schema
Step 1
In your project directory, create a file and name it user.model.js. Inside the file you will create a user schema which is basically a JavaScript class, find the code below to do so:
const mongoose = require("mongoose");
const schema = new mongoose.Schema({
  fullName: String,
  email: String,
  password: String,
});

module.exports = mongoose.model("user", schema);
Step 2
In your project directory, import the user.model.js file into the index.js file, see below the code line to do so:
const User = require("./user.model");
Business Logic for Server Endpoints
You will require certain helper functions for the development of this app. Please refer to my previous article on how to invalidate a JWT for more comprehension. The approach described in the article will be the foundation of your helper functions for this app, however, some more modifications will be made later in the process of development.
Step 1
Create a helper.js file in your project directory, the code to do this is shown below:
touch helper.js
Step 2
See below for the modifications made to the helper functions:
const jwt = require("jsonwebtoken");
const createError = require("http-errors");
const redisClient = require("./config/redisCache");

module.exports.generateJWT = (payload, expiry) => {
  return jwt.sign(payload, "theSecretKey", {
    expiresIn: expiry,
  });
};

module.exports.verifyJWT = (token) => {
  return jwt.verify(token, "theSecretKey");
};

module.exports.addToken = async (id, token) => {
  const key = `${id}_${token}`;
  const check = await redisClient.EXISTS(key); // check if key exists in cache
  if (check == 1) return createError(500, "Cache error");

  await redisClient.SET(key, "valid"); // set key value to be 'valid'
  const payload = this.verifyJWT(token); // verify and decode the JWT
  await redisClient.EXPIREAT(key, +payload.exp); // set expiry date for the key in the cache
  return;
};

module.exports.checkToken = async (id, token) => {
  const key = `${id}_${token}`;
  const status = redisClient.GET(key); // get the token from the cache and return its value
  return status;
};

module.exports.blacklistToken = async (id, token) => {
  const key = `${id}_${token}`;
  const status = await redisClient.SET(key, "invalid"); // set key value to be 'invalid'
  if (status == "nil") return createError(404, "Token doesn't exist");
  const payload = this.verifyJWT(token); // verify and decode the JWT
  await redisClient.EXPIREAT(key, +payload.exp); // set time duration for the token to removed from the cache
  return;
};

module.exports.blacklistAllToken = async (id, token) => {
  for await (const key of redisClient.scanIterator({ // scan the cache and return all token with the id
    MATCH: `${id}*`,
  })) {
    await redisClient.set(key, "invalid"); // invaliadate each key
    const payload = this.verifyJWT(token); // verify and decode the JWT
    await redisClient.EXPIREAT(key, +payload.exp); // set time duration for the token to removed from the cache
  }
  return;
};
Add the above code snippets into your helper.js file.
Step 3
Inside your index.js file, create an endpoint to register users, find below the code snippet to do so:
app.post("/register", async (req, res) => {
  const { password } = req.body;

  const hash = await argon2.hash(password); // hashing the user password
  req.body.password = hash; // updating the password field to the hashed version

  const user = new User(req.body); // creating a user object from our schema class
  await user
    .save() // persist user to database
    .catch((err) => next(createError(500, err.message)));

  res.status(201).json({
    message: "User saved successfully",
   });
});
Step 4
Next, you create an endpoint for users to login, find below the code snippet to implement this:
app.post("/login", async (req, res, next) => {
  const { email, password } = req.body;

  const user = await User.findOne({ email: email }); // query the database for the user
  if (!user) return next(createError(404, "User record not found"));

  const match = await argon2
    .verify(user.password, password) // compare password with the hash
    .catch((err) => next(createError(500, err.message)));
  if (!match) return next(createError(400, "Incorrect user details"));

  const accessToken = helper.generateJWT({ id: user.id }, "5m"); // generate JWT
  const refreshToken = helper.generateJWT({ id: user.id }, "12h");

  await helper.addToken(user.id, accessToken); // add JWT to checklist
  await helper.addToken(user.id, refreshToken);

  res.status(201).json({
    message: "Login successful",
    body: {
      id: user.id,
      accessToken: accessToken,
      refreshToken: refreshToken,
    },
   });
});
Step 5
Next, create an endpoint for users to logout of your app, below is the code snippet for the logic:
app.post("/logout/:id", async (req, res, next) => {
  const id = req.params.id
  const authHeader = req.headers.authorization; // extracting the token from the header
  if (!authHeader) {
      return next(createError(400, "Missing authorization header"));
  }
  const accessToken = authHeader.split(" ")[1]; // extracting the bearer token

  await helper.blacklistToken(id, accessToken); // Blacklist JWT

  res.status(200).json({
    message: "Logout successful",
  });
});
Step 6
Now, create an endpoint that holds the resource that a user wants to get from your server, below is the code snippet for the implementation:
app.get("/resources:id", async (req, res, next) => {
  const id = req.params.id;
  const authHeader = req.headers.authorization; // extracting the token from the header
  if (!authHeader) {
    return next(createError(400, "Missing authorization header"));
  }
  const accessToken = authHeader.split(" ")[1]; // extracting the bearer token

  const temp = await helper.checkToken(id, accessToken); // check token validity
  if (temp === "nil") {
    return next(createError(500, "Refresh token cache error"));
  }
  if (temp === "invalid") {
    return next(createError(401, "User should re-login"));
  }

  try {
    await helper.verifyJWT(accessToken); // verify JWT
  } catch (e) {
    return next(createError(401, e.message));
  }

  res.status(200).send("Hello! Welcome to the protected backend archive.");
});
Step 7
Lastly, create the refresh endpoint, which will be responsible for the generation of a new access token for clients interacting with your server provided the old one has expired or invalidated and the refresh token hasn't been used previously.
app.get("/refresh/:id", async (req, res, next) => {
  const id = req.params.id;
  const authHeader = req.headers.authorization; // extracting the token from the header
  if (!authHeader) {
    return next(createError(400, "Missing authorization header"));
  }
  const refToken = authHeader.split(" ")[1]; // extracting the bearer token
  const temp = await helper.checkToken(id, refToken); // check token validity
  if (temp === "nil") {
    return next(createError(500, "Refresh token cache error"));
  }
  if (temp === "invalid") {
    await helper.blacklistAllToken(id, refToken); // blacklist all access and refresh token identifiable with the user
    return next(createError(401, "User should re-login"));
  }

  try {
    helper.verifyJWT(refToken); // verify JWT
    await helper.blacklistToken(id, refToken); // blacklist refresh token
  } catch (e) {
    return next(createError(401, e.message));
  }

  const accessToken = helper.generateJWT({ id: id }, "5m"); // generate JWT
  const refreshToken = helper.generateJWT({ id: id }, "12h");

  await helper.addToken(id, accessToken); // add JWT to checklist
  await helper.addToken(id, refreshToken);

  res.status(201).json({
    message: "Token generated successfully",
    body: {
      id: id
      accessToken: accessToken,
      refreshToken: refreshToken,
    },
  });
});
Test with Postman
Postman is an HTTP client that is used to test HTTP requests. It also has a graphical user interface for testing APIs, which is very convenient. If you're interested, here's how to get started with using Postman. To test your system, follow the steps below:
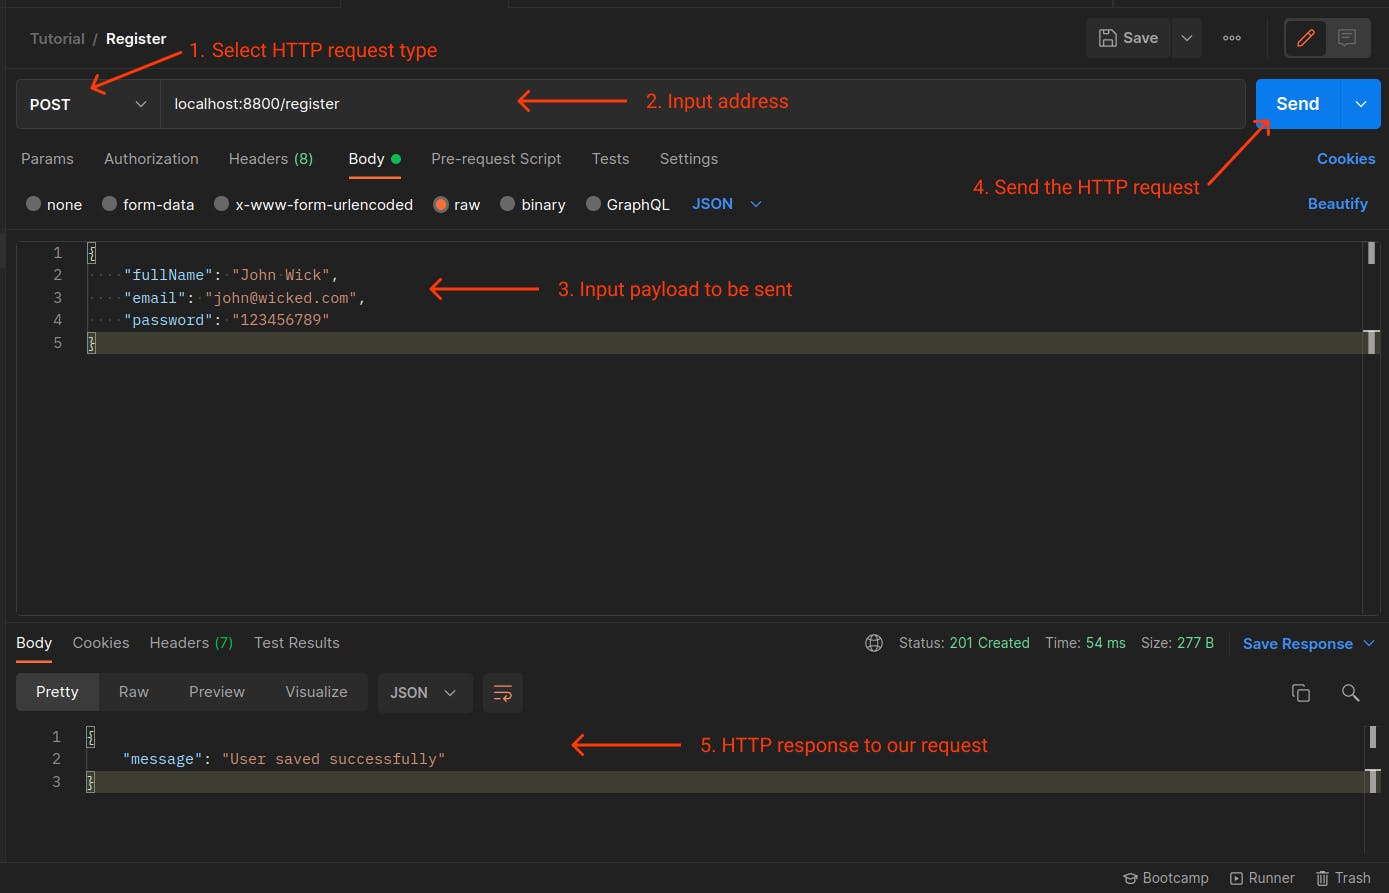
Step 1
First, create a new user by testing the registration endpoint, see below for demonstration in Postman:
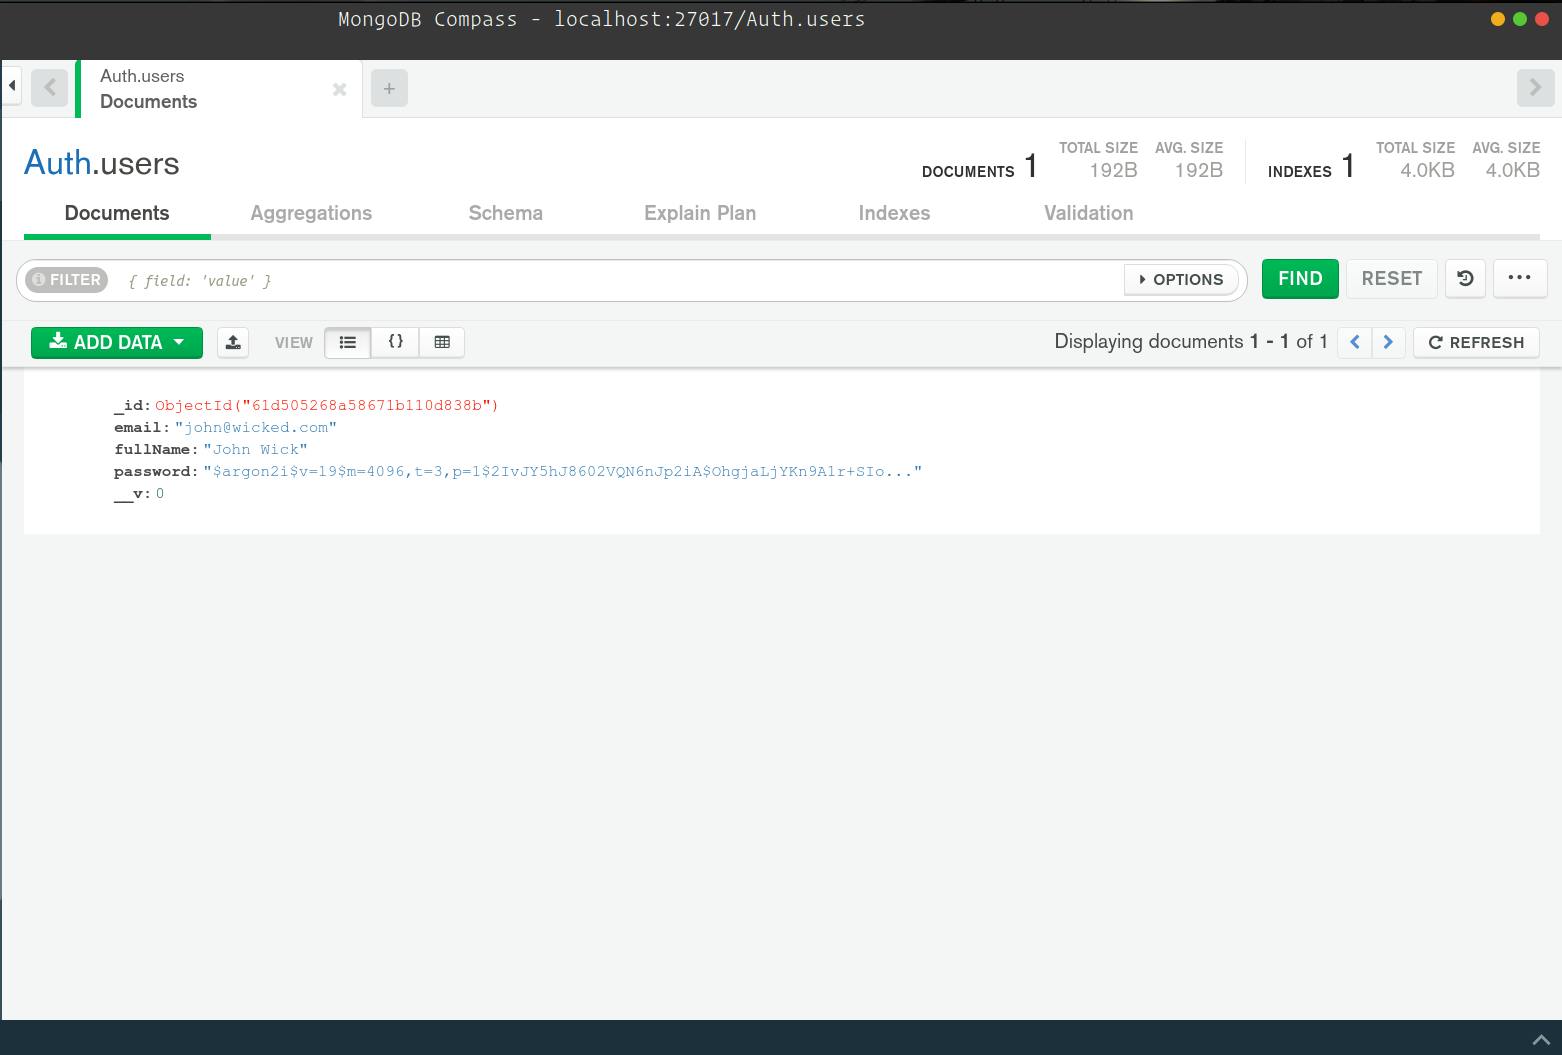
And below is what our MongoDB database looks like:
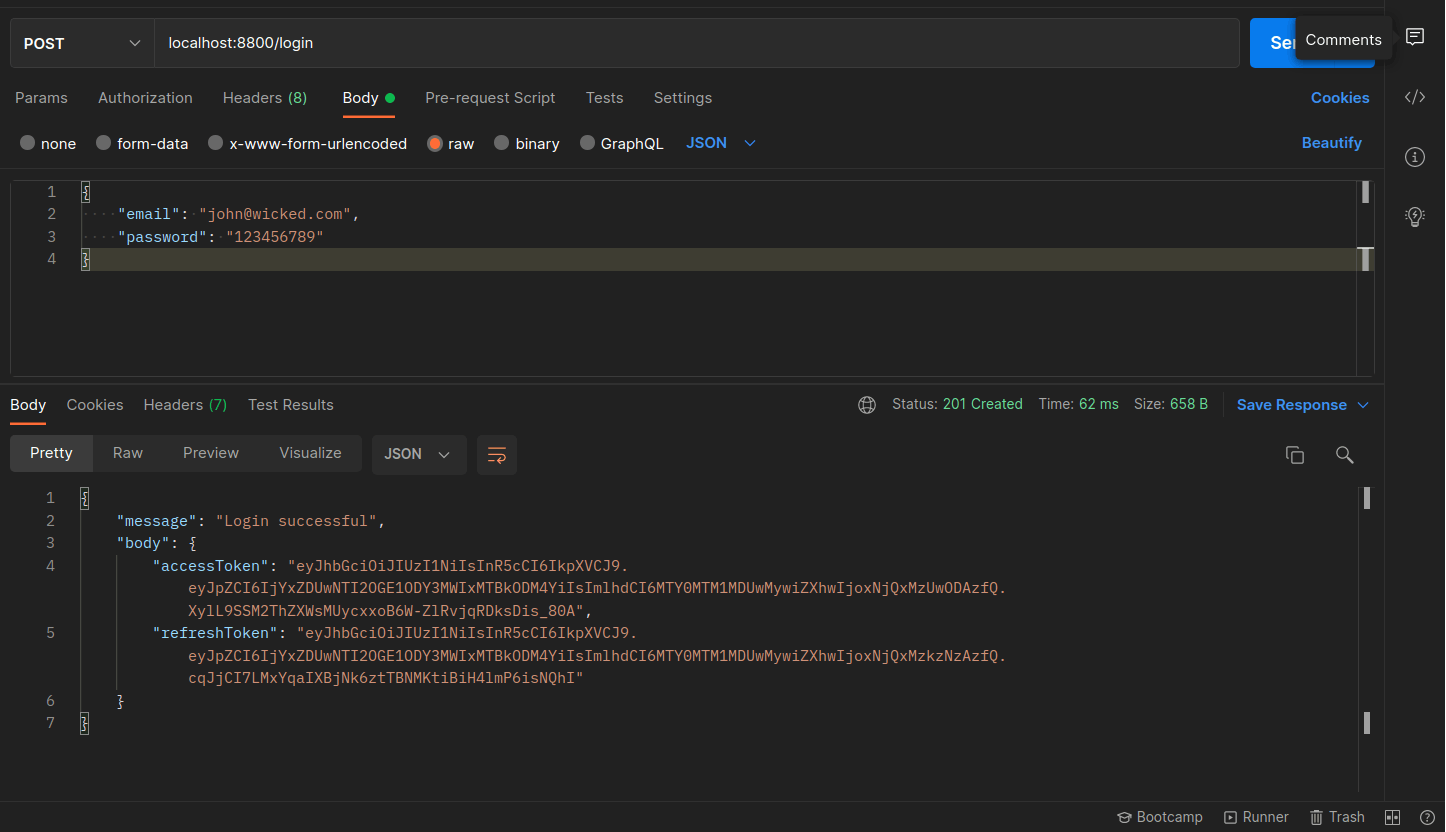
Step 2
To sign in a registered user on your server, see below for the request and response:
Step 3
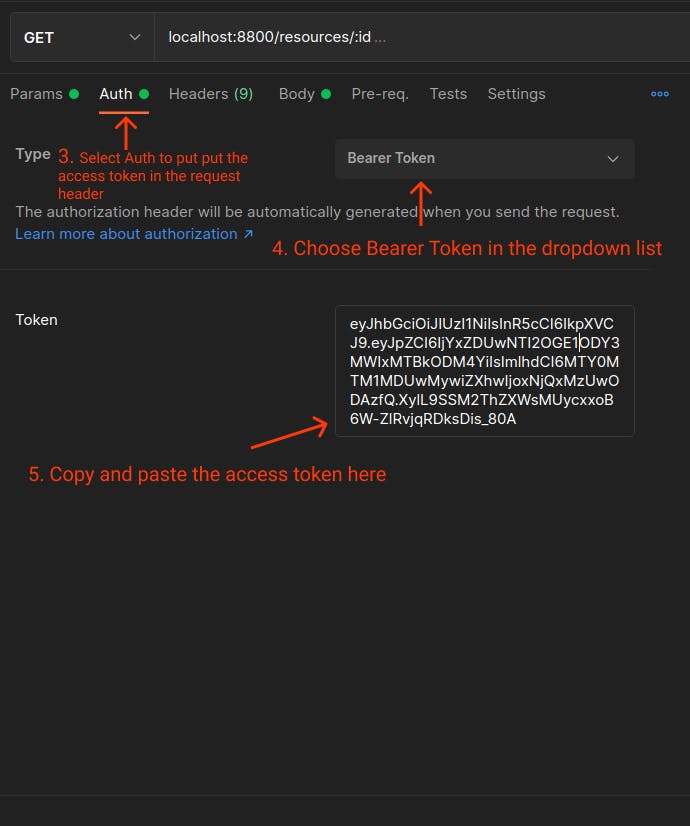
To access the protected endpoint on your server, see below the demonstration in Postman to do this :
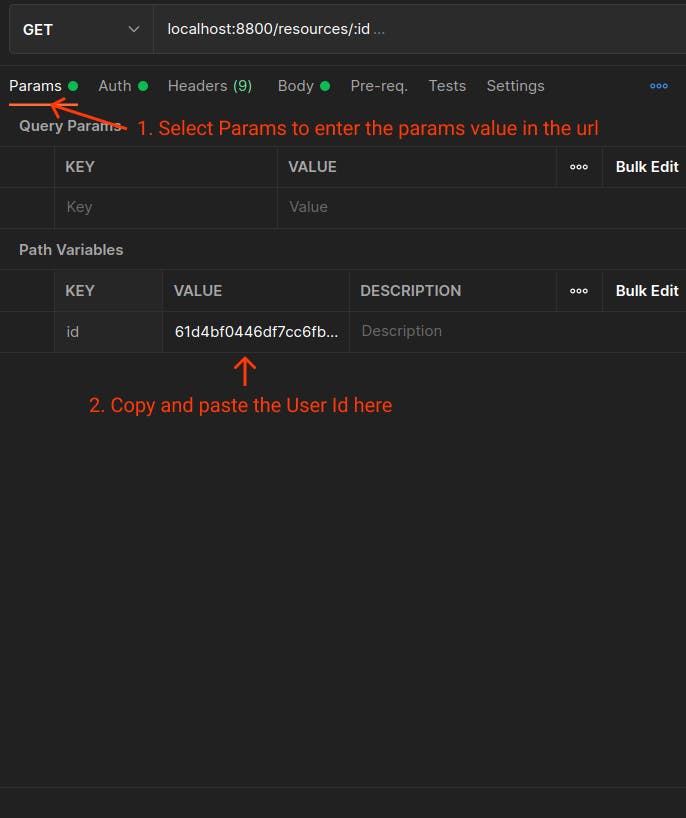
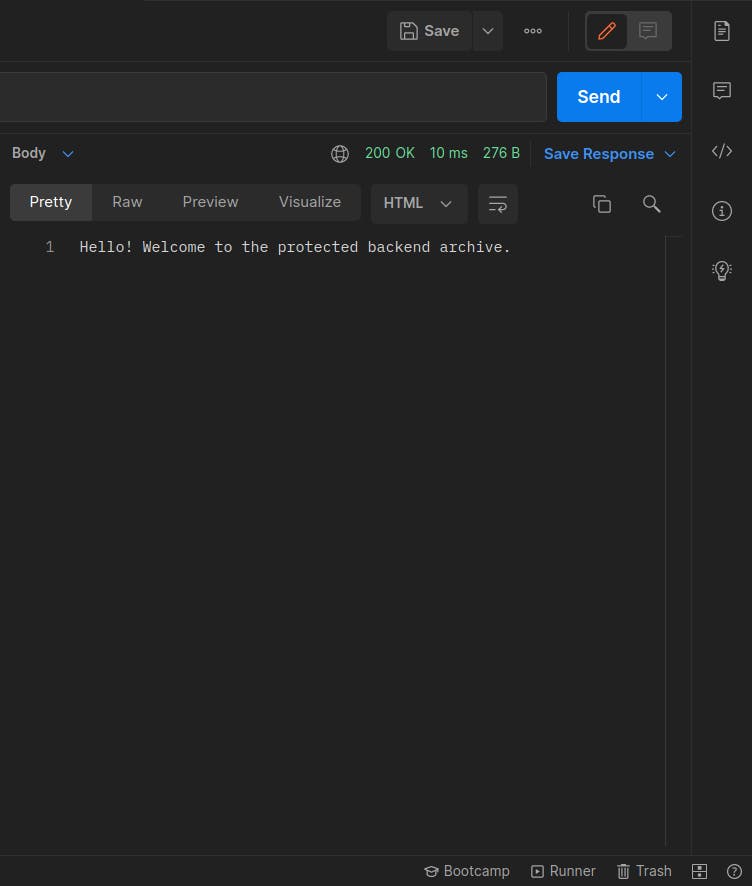
Below is the response to the request sent.
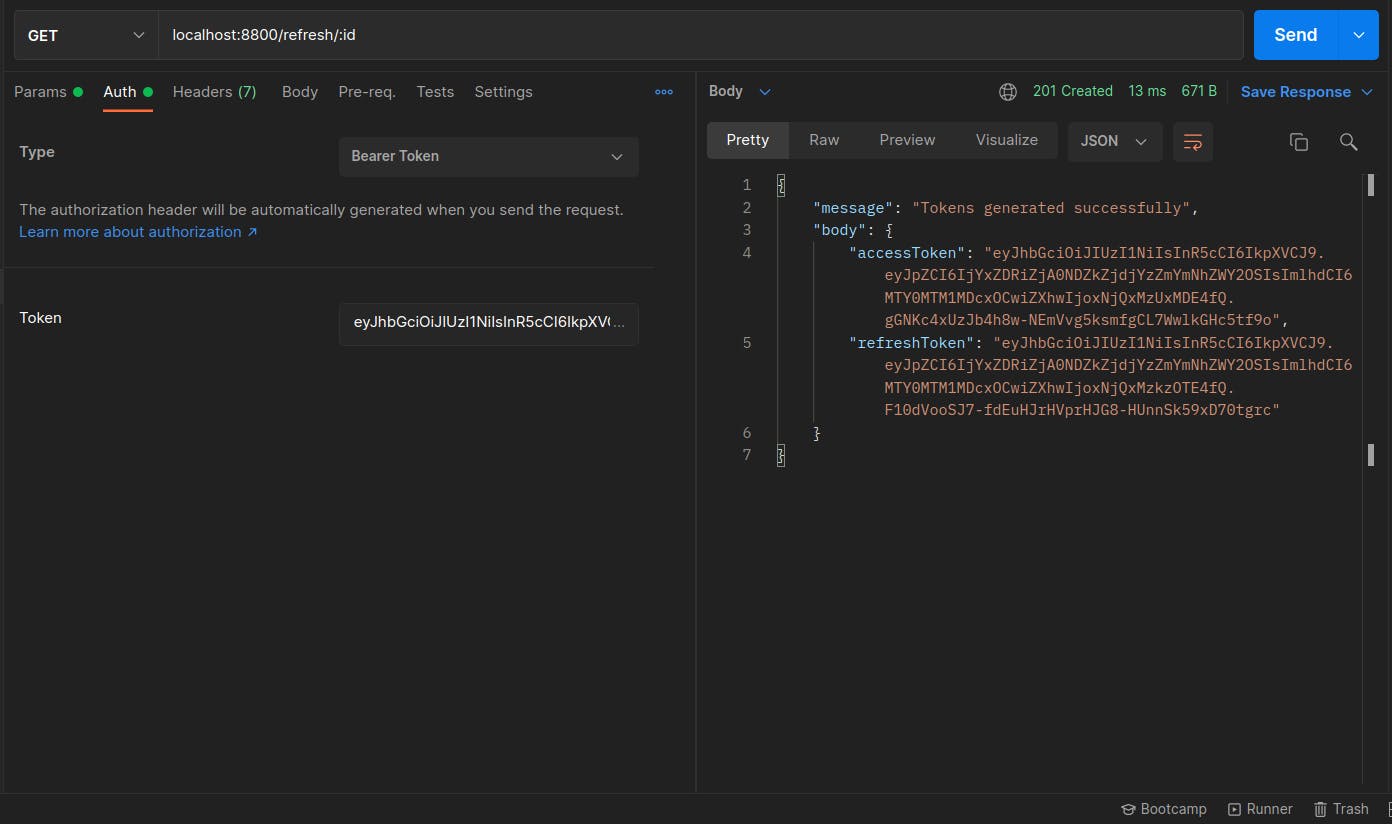
Step 4
Lastly, to generate new access and refresh tokens for clients interacting with your server, follow the clicks in step 3 to populate the Postman fields. See below for the request and response:
Conclusion
In this tutorial, you have learnt how to invalidate a JWT, how to use JWT in an authorization system, and how to use a refresh and access tokens. If you want to examine a sample of the code that each file in this app project directory should contain, you may look at the project file on Github here.
The authorization system described in this tutorial is not intended for usage in a production environment; rather, it is intended to demonstrate the concept of invalidating a JWT and how it may be implemented in an authorization system. It is recommended that readers study and enhance this method in order to mitigate any security risks that it may pose.
Thank you for taking the time to read this; cheers to changing the world one line of code at a time.